
2nd Generation 2004 2005 2006 2007 2008 2009 Toyota Prius Speedometer Dash Light Out Issue Complete Fix DIY
How to completely fix outage/dark cluster, combination meter, instrument panel, speedometer, or dash on a 2004 2005 2006 2007 2008 or 2009 Toyota Prius
To completely fix your cluster, combination meter, instrument panel, speedometer, or dash that is going out and causing other issues such as not being able to turn off vehicle, unable to open trunk, backup camera not functioning, and forcing you to reset your Prius by unplugging the white harness by the battery terminal, which will only solve the issue temporary; follow the next steps to fix it completely and avoid paying hundreds of dollars for a simple solution. Do-it-yourself!
Heads up! You will need to remove dash and solder a capacitor in back of the speedometer, which should be a piece of cake if you follow the steps below.
Estimated time to complete the job is 1.5 to 3 hours, but make sure to take your time so you won’t break any pieces.
Tools required for dash removal:
- Philips screwdriver
- Flathead screwdriver
- 10mm socket
- 12mm socket
- Ratchet with extension
Tools required for soldering capacitor:
- Soldering iron (preferably a kit)
- 100uf 16v or 220uf 16v capacitor
- Capacitor meter (optional)
Affiliated eBay links to products I suggest for this DIY job:
Soldering Kit:
Electric Soldering Iron Kit – eBay
Capacitor 100uf 16v:
Capacitor 100uf 16v (Pack of 5) – eBay
Capacitor 220uf 16v:
220uf 16v Capacitor 5 Pack – eBay
If you want to test the performance on your capacitor make sure you get a capacitor meter with uF measurability, a multimeter might not have this function. Here’s a link for a uF meter:
Step 1: Remove the dash to get to the speedometer/combination meter. Watch this video that shows you step by step on how to remove it (don’t ship it to someone to get it fix like the guy does on the video, you can fix this yourself and save time and money; follow step 2 after): https://www.youtube.com/watch?v=pb19p8zYeTg&t=309s
Step 2: Once the speedometer/combination meter is removed to the part where you can see the circuit board or electronic components inside, (example image below), locate the defective capacitor.

Locate capacitor 100 16v (example image below).
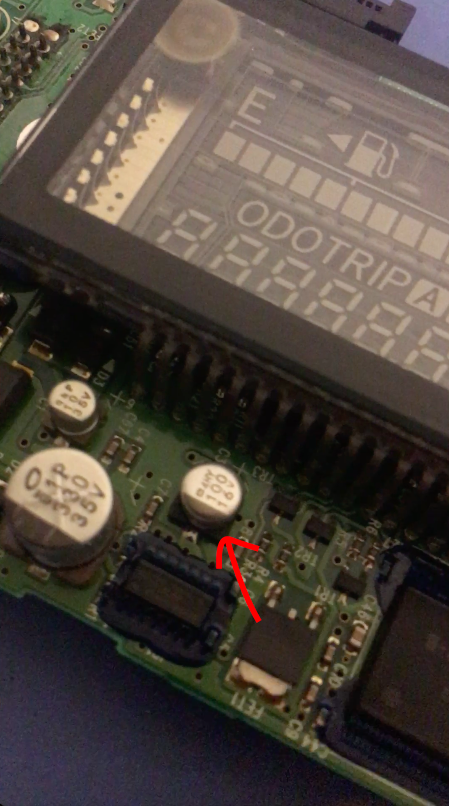
Now you can either solder a 100uf 16v on top of the 100uf 16v or remove it and replace it with a 220uf 16v capacitor. I personally think it is easier to solder the 100uf 16v on top of that one. An example image of what I did shown below. You can probably do a better job than I did, this is my second time doing this.

According to some forums and videos found online this capacitor is the only thing that is different in the new speedometer, which is said to be too weak to hold the capacity.
Step 3: Finally, you can put everything back together and enjoy your Prius again.

**UPDATE**
Curious to know if the sample vehicle used in this demonstration is still functioning?
It is! Since 2018 up until now, 02/27/2022, the Prius dashboard has no longer experienced the dash issue. This was done in the 130k mark and now the Prius has over 200k. I can confidently recommend this solution to anyone experiencing this issue.

Get you Prius Gang Hoodie or shirt! Click on link below.

Make a one-time donation
Make a monthly donation
Make a yearly donation
Choose an amount
Or enter a custom amount
Your contribution is appreciated and will help this website grow to support the Prius community.
Your contribution is appreciated.
Your contribution is appreciated.
DonateDonate monthlyDonate yearly
Terrific article. Very clear and easy to follow. Thank you very much!
Dick Mohlere
LikeLiked by 2 people
Thank you! I was able to get thru this task relatively easily with the help of this page.
I removed the original capacitor and soldered a 220uf 16v capacitor onto the two silver pads that were there. It wasn’t totally obvious what to do, so I thought I’d leave a note for the next person.
The most time consuming part of the whole thing was taking the dash apart since mine had never been disassembled before.
Thanks again!
LikeLike
Had mine removed, sent out for repairs, place it back in and it still doesn’t work?
LikeLike
Hi Ed,
It’s possible that the capacitor they replaced it with is too weak or solder incorrectly.
LikeLike
Thank you! Thank you!… I followed easy instructions and Wham! lights lid up.
LikeLike
Simon, glad to know it worked out. Cheers!
LikeLike
The links to the capacitors in Amazon are discontinued. Any suggestions where the 22 capacitor can be purchased? Thanks
LikeLike
Thank you
LikeLike
Thank you! 🙂
LikeLike
Thanks for the page. I followed the directions and I was able to complete the repair. It took me about 6 hours to get through everything, but well worth the time. Appreciate the effort you and the youtube producer put in to help people.
LikeLike
Glad to hear it worked out!
LikeLike
thank you .
LikeLike
Thanks for taking the time to make this page. This saved me about $1200. I should have probably just piggybacked a 100 microfarad like you did, but a 220 was what I had. I removed the original by using the soldering iron to heat up the positive and negative pad for the original capacitor and wiggling it off when each side became liquefied. I used VFerdman from priuschat’s idea to bend the leads of the capacitor at 90 degree angles to act like “feet”, and tinning the feet and pads before attaching them together. I am not good at all at soldering, but I had a little luck (or the divine guidance I prayed for) on my side for about 45 seconds of relative competence.
LikeLike
After reading this, I sense we got royally screwed by the Toyota dealership mechanics. We paid over $700.00 to get ours fixed. We we’re having the same issues…having to tap the battery ends, dashlights not working, the engine wouldn’t shut off, etc.
LikeLike
No you didn’t get screwed. Toyota is not going to change just the capacitor. They are going change the whole defective unit. Which probably costs an arm plus the labor to take the dashboard apart plus a warranty. It’s not easy. I did this myself yesterday and $700 sounds like a deal!!
LikeLike
Question: I’m having the typical problems on my 2004 Prius (blank dash, can’t turn car off), but the 100 uf capacitor on the board measures perfect, 100uf. Could it be something else besides the capacitor?
LikeLike
Hi Robert, I would still assume the 100uf capacitor is too low. I’ve encountered other ones that also measure perfect and it is still that stubborn capacitor. Please share how it goes, this will help others as well.
Thank you!
LikeLiked by 1 person
Thanks for the response. I took it apart today and soldered a 100 capacitor. Put it back together and it seems to work fine so far.
LikeLike
Glad to hear that, I hope this has solved your issue with tour prius. Take care.
LikeLike
am yet to fix mine,let hope it works
LikeLike
Yes my Prius too thank you god.
LikeLike
Great DIY post! I have read many forums (mostly priuschat) & seen videos. Texas Hybrid Batteries suggest to replace 3 capacitors & the regulator ic. Others say same as you. Thanks for the simple, confident fix with helpful photos! Please tell us if your fix is still working (any issues?) & since when (2-’18 by comment date?).
LikeLike
I just replaced this capacitor with the 220 16v, not a surface mount I did the other style. I cleaned the pads well and soldered the new capacitor in the correct polarity. I started the car the dash came on but was not reading the gas level and was not showing data on the data screen (2nd screen that shows the levels) I took it for a ride and it cut out and went black. It came back on and then showed the correct gas level. I went to start the car again a little while later and its blacked out again. I was going to try to disconnect the battery again to see if that would reset it like it used to before. Any feedback would be greatly appreciated.
LikeLiked by 1 person
It’s possible the capacitor is not soldered correctly. I would start there, also check all the connections are plugged in correctly.
LikeLiked by 1 person
Can I use a 220 uf 35v or does it have to be 220 uf 16v
LikeLiked by 1 person
I would probably stick to the 220uf 16v. I already know it works for sure. It has already been about 3 years and I still have my same prius running and haven’t had an issue ever since I changed it.
LikeLiked by 1 person
Will any 220uf 16v do? Or is there anything else that i need to look for ?
LikeLiked by 1 person
Will this work? It says 6.3v to 16v
BOJACK 6X12mm 10 Pcs Aluminum Electrolytic Capacitors
Product Features:
Capacitor Capacity: 220uF
Rated working voltage : 6.3V to 16V
Capacitance Tolerance:±20%(120MHZ,+20℃).
Capacitor dimension:6x12mm/0.24×0.47 inch
Suggest operating Temperature:0-85℃/185℉,Maximum Operating Temperature: 105℃/221℉
The aluminum electrolytic capacitor has a function of blocking direct current through alternating current.
This series is for DIY, communication equipments,circuit board,switching power supply,industrial measuring,automotive electric products,etc
LikeLike
I used a 220 25v and it works fine. I bet a 220 35v would be ok too.
LikeLike
Higher V is ok. I’ve seen the comparison to a gas tank. You don’t have to fill it, but if you overfill it, that’s bad.
LikeLike
Yes, higher voltage is no problem, it just means the capacitor will be larger
LikeLike
35V should work without problem.
The voltage is the limit for the capacitor. If exceded, it tends to ruin the capacitor.
Since the circuit is nominally 12V (but could be up to 15V temporarily), a 16V capacitor would normally be used.
LikeLike
Thanks for posting this. I will try soon.
LikeLike
WOW! This issue has been messing with me for the past few years. I had a 2007 Prius that did this every now and then, but unplugging/replugging the battery wasn’t a big hassle. That Prius got in a wreck, and I got another 2007 model, and this issue slowly became more and more prevalent. The dash wouldn’t light up almost any time I turned the car on, and it was becoming a huge issue. I looked high and low for a solution, and this is the only one that actually truly worked. THANK YOU so much for this write up
LikeLiked by 1 person
This was amazing!! My 2008 prius starting doing this right after I replaced my battery. I was so mad because I had just spent $250 on my new battery and now this! Dealership wanted $1200 to fix it….I followed these directions and fixed it for $5.99. (I had NEVER tried anything like this.) I just happened to have a soldering iron in the garage and was willing to try! Here is the link to my 3 min video journey of following your recommendations! https://youtu.be/6bakA1GbvJ4
LikeLike
Which is better the 100uf 16v Or the 220uf 16v?
LikeLike
I would go with the 220
LikeLike
Thank you so much. I did have to do it twice as I didn’t have a good solder job the first time. Very helpful thanks again.
LikeLike
Very helpful thank you very much. I did have to take the dash apart twice because first time soldering in ages. Double check your solders.
Great resource Thanks again!
LikeLiked by 1 person
Refined
LikeLike
Direct
LikeLike
Concrete
LikeLike
Thanks a bunch! The site was very helpful to clearly lay out the best ways to tackle this annoying issue. I ended up using a through hole near the positive lead of the capacitor for a better solder point when soldering a 100μF 16V capacitor in parallel. Negative lead was pretty easy to get to with my soldering iron at least.
LikeLiked by 1 person
Any advice on my thread here on Reddit with this issue? I found some corrosion on the back of the board and was wondering if it is worth going through the trouble of soldering and reinstalling if the corrosion is the problem. Might need a new (refurb) board instead? https://www.reddit.com/r/MechanicAdvice/comments/k7jmnt/2008_prius_combo_meter_corrosion_question/?utm_source=share&utm_medium=ios_app&utm_name=iossmf
LikeLike
Hi Josh,
I am unsure how much it costs to get a refurbished one but it’s under $100 I would probably consider it., if not, I would say try the method that’s on here first to see if it works and if it does not work then get a refurbished one but keep in mind you’ll probably spend more and you might need to adjust the miles to have it display the correct numbers. It’s weird that it has corrosion but it doesn’t look too bad in my opinion. I would also check you’re not getting any moisture inside your prius. Hope you get it solved.
LikeLike
Hi
I replaced the capacitor to 220/25v
But it still not working,
Any idea what else ?
Thank you
Moshes
LikeLike
I went slow and took six hours. The electrical connectors threw me for a loop. It took me an hour to figure out how to release the plastic tab holding them together. The soldering was a nightmare. Now I see that you added insulation jackets around the capacitor leads. I didn’t think of that. Ah well, the car still turns on and runs fine. Hard to know whether the problem is solved, but maybe it is.
LikeLike
Works well!!! Fixed my car.
Thank you very much for the guide.
LikeLike
I just fix my Prius 06 last night with a 100 uF 16v on top of the old one. The dash light is on after I reinstalled but this morning all the dash lights is black out again. I am very disappointed and bored now.
LikeLike
I removed dashboard a day later and replaced a 200uF 16v and everything ok after 12 day now. Thanks to admin for teaching me. Appreciate
LikeLike
Appreciate the information here. I do all my own work on my cars. Seeing that some people on here did not get the fix that they hoped for, I often wonder when some one goes through all this, ( which I intend to do) that the very act of unplugging and plugging back in may have fixed the problem. Terminals and connections corrode over time and you may have fixed it by accident. Had a similar problem problem with my traction battery and it turned out to be a corroded pin in the voltage regulator connector. Just food for thought.
LikeLike
Ça a marché chez moi merci.
LikeLike
What a great article.
I had so much fun tearing into my 2007 Gen2 Prius and pulling things out. It took me about 4 hours to complete the job as I’ve soldered before.
Thank you again for helping the Prius community.
LikeLike
I have a 2008 Prius and like everyone else in this forum I had black dashboard problem. I had been temporary fixing it with unplugging and plugging the battery and at some point even this method stopped working for me. So I decided to try this method with soldering 220uf 16v capacitor. It fixed the problem and I had the dashboard lights for a couple of days. However on a third day the dashboard lights went off again. So I’m thinking it’s a bad soldering but would a bad soldering fix the problem temporary? Thanks.
LikeLike
Hi Victor, not saying it is but a bad soldering could cause it to turn on temporarily. I would also recheck all the connections make sure they’re on tight or anything else that could have gotten damaged when when soldering. Hope you find the issue easily.
LikeLike
I ended up taking a part the dashboard again and re-soldering the capacitor as it was
Indeed a bad soldering. It has been 2 days since then and my dashboard lights are still on. Thank you!
LikeLike
Fuel level indicator (the whole indicator section with level and the E and F icons ) and “mi” after ODO numbers are flashing now after doing it with the 220uF 16v capacitor and removing the old one. Ideas on what to look at?
LikeLike
Thank you for this excellent guidance! I’m about to do this on my 2007 Gen 2, 195k mi. Did the start button-climate button-light flash dance successfully for the past 30k or so miles, but now the dash finally permanently died. Found a giant selection of capacitors at DigiKey. Does the impedance/ ohms rating of the capacitor matter? If so what would be a target rating for the 100 and 220 caps? I’m electrically illiterate. Friend will help with the soldering.
LikeLike
A capacitor is not supposed to pass current.
Once it is charged (in a very short period of time), the resistance/impedence is supposed to be essentially infinite.
So the resistance of a capacitor is not meaningful.
It would be useful to have a capacitance meter, to check the capacitance of replacing components. A nominal 220 microfarad capacitor could be only 200 microfarads, and still be considered acceptable if rated ±10%.
I haven’t yet replaced the capacitor on my Prius, but I have already bought a good capacitance meter and some 220 microFarad 16V capacitors. (They test from 208 to 220 microFarads.)
Don’t forget that you need a capacitor rated at least 16V.
For info, my temporary solution to avoiding the black dash display is a heater plugged in to my Prius, whenever the temperature will drop to less than 10 to 15°C.
If it stays warmer, everything fonctions normally.
LikeLike
The solution worked perfectly. I paid $250 to a mechanic to uninstall and reinstall the Combination Meter, and I personally handled the soldering aspect. Having a capacitor tester proved beneficial as it allowed me to verify the capacitor’s capacity post-soldering. Thank you!
Non-functional gas gauge is an issue in Prius gen 2 and is unrelated to the combination meter. A workaround involves filling the tank to 8-10 gallons, prompting the gauge to accurately read and display the gas levels.
LikeLike
I just installed the 220µF 16V capacitor (actually only 218µF) in place of the old 100µF capacitor. The hard part was removing the old capacitor, finally by destroying it.
Luckily there was a lot of room to solder the feet of the new capacitor, since my soldering iron didn’t have a very fine point. I made sure that it was very well soldered. It has been a week, and it works perfectly.
The hardest part was disembling to access the instrument panel. In the processed I damaged one molding (now repaired). I watched a lot of videos, and only after finishing the process I found one that showed how to best remove the parts. Start at the bottom of each piece, and pry GENTLY until the parts release, a little at a time. Using a tape-covered flat screwdriver. Start with pieces at the outside, bottom and work toward the centre and up.
The upper corner panels are tricky to remove. Videos say to use a needle-nosed plier to turn the retaining piece. It fact you have to twist it, since its’ base does not turn. Be careful not to damage (cut) the retaining piece, since it is important for security if the corner air bag is ever set off
The videos mostly show where to find the screws to remove. The camera screen is the last part before the instrument panel, and once the 2 bolts are removed, you have to pull firmly with 2 hands to remove it. There are a few connecters to remove.
Once the instrument panel is removed from the car, most videos show how to remove/install the combination metre.
Good luck
LikeLike
Thank You for your encouragement. In my case the speedometer going dark and the car not turning off and the backup camera not working are issues that don’t happen very often. I installed an aftermarket big number GPS speedometer and rely on that until applying the power button long press followed by the two quick power button presses. Thanks again
LikeLike
Anyone who lives in Southern California and would like me to either do the whole process or just the taking apart the combination meter and soldering for a reasonable price let me know. I did this successfully on both of my Gen 2 Prius and have done for others since. I live half time in LA and half time in San Diego. Chris. Christobolmay@yahoo.com 310-903-9713.
LikeLike